Archiving Windows Outlook 2016
Outlook has a tool you can use to backup and restore your mailbox called the "Import Export Wizard".
To get to it click the file tab open an export and Import/Export.
You back up your mailbox by exporting it to a file on your computer and then restore data by importing it from the file back to your mailbox.
To start we'll select export to a file and Next.
The type of file you export to is an Outlook data file with a ".pst" file extension click Next.
Here you decide what parts of your mailbox to backup.
You could backup just your inbox, or contacts for example.
Click "Filter" to further refine what you export.
For example, if I type Contoso, and then click in and company field only.
Only contacts that work for Contoso will be backed up. Click cancel to remove the filter.
In this case we'll click the email account at the top to export the entire mailbox
and make sure to include subfolders.
Click Next
and click Browse.
Navigate to a location, type a name for the data file
and click OK.
Now, you can choose one of these options, which deal with duplicates when you are exporting to an existing data file.
For example, the next time you backup you can export to the same file and select "do not export duplicates". Then Outlook will only export new-mailbox items.
But since we are creating a new data file it doesn't matter which option we select. Click Finish...
(Optional - If you want, add a password to help protect your file and click OK.)
...and your entire mailbox is downloaded to the Outlook data file.
Note that this could take a while if you have a large mailbox.
Now, let's look at restoring data.
Lets say you want to retrieve some email that you permanently deleted from your online mailbox.
If the mail is backed up you can restore it from the backup file.
Click the FILE tab, open an export and Import/Export.
Select import from another program or file and Next.
Select Outlook Data File and Next.
Click Browse, locate the backup file and Open.
Now, you need to think about how to deal with duplicates.
If you're only interested importing items over deleted you can select do not import duplicates.
Now Outlook won't import items that already exist in your mailbox.
Click Next.
Here, select the folder to import from.
Since we are only importing non duplicate items we could choose the whole file,
but think about it this will replace items that you intentionally
deleted.
Maybe what you want to do is only import from a specific folder or again you can use the filter to get even more specific.
In this case we will click the email account at the top, make sure include subfolders is checked...
... and finally select "import items" into the same folder in and choose your
email account.
Then, click Finish
...and the items are added to your account.
If you click Finish and immediately get an error like this, it's because your
email provider doesn't support adding items to the mailbox.
If this happens you can click the FILE tab, Open & Export and open Outlook Data File.
Then select the backup file and it opens in your folder list as a personal folder.
Now, you can access the items in your backup file.
Here is Guide for archiving emails, produced by a company called Pageplay. The information is generic and can be applied to most email services in general.
This guide will help you to free up space on your Eyelook email account by saving emails to your computer rather than keeping them on the server.
This guide is only useful if you set up the email to use IMAP, where messages are stored on the server. With POP, messages are download to your computer when you check your mail and are then removed from the server.
This is for users who already access their email using Windows Live Mail 2012
1. Open Windows Live Mail 2012
You will need Storage folders to be visible to archive your emails. If you can't see the "Storage folders" heading in the left column, click on the "View" tab at the top of the window and ensure the "Storage folders" button is pressed.
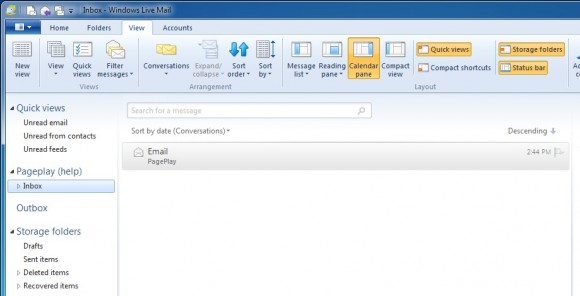
2. Create archive folder
If you haven't archived your emails before, you'll need to create a local folder to archive your emails to. Right click on the "Storage folders" heading in the left column and click on "New folder..."
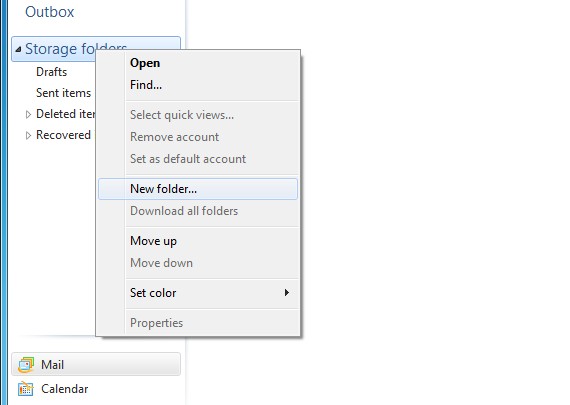
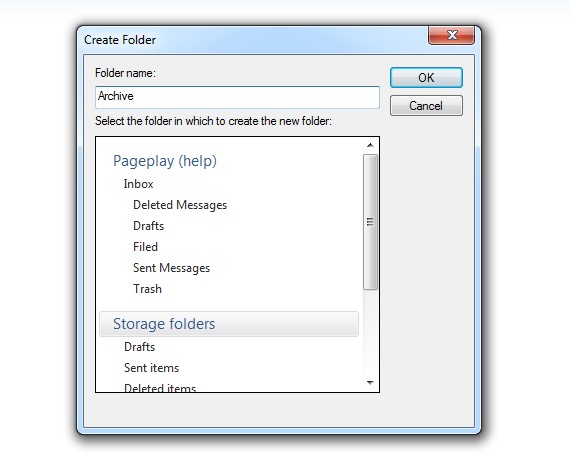
You then need to give your archive folder a name, in the example below we've given it the name "Archive" for simplicity.
Click on the "Storage folders" heading in the "Select the folder in which..." field and then click the "OK" button
You will then see your archiving folder under the "Storage folders" heading

3. Moving emails
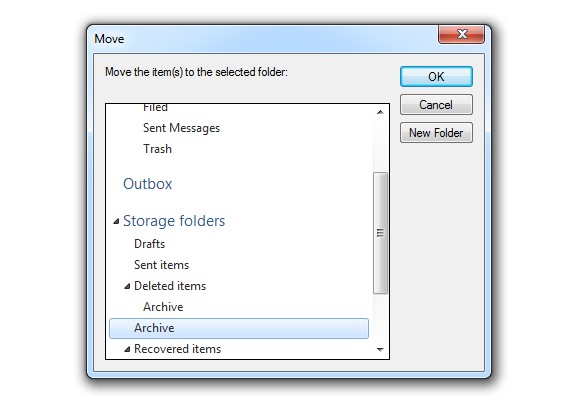
ou can now either drag and drop emails from your Inbox to your archiving folder in the left column, or you can right click on emails and choose to move them. See the example screenshot below.
Remember, you can drag and drop or choose to move multiple emails at once.

Additional...
Confirm Windows Live Mail is purging your deleted items
WLM will simply hide emails when you choose to delete them unless it's told to purge them periodically. Follow the steps below to ensure this option is enabled.
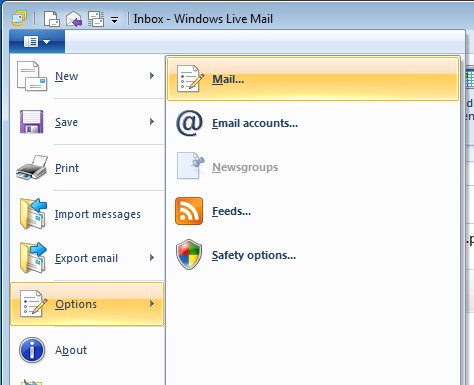
1. Open WLM Mail Options
As shown in the screenshot below, click on the blue dropdown next to the "Home" tab and choose "Options" followed by "Mail..."
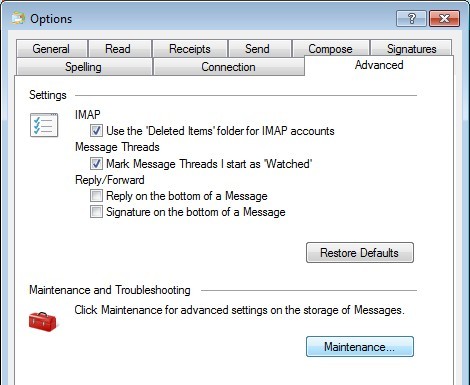
2. Find the "Maintenance..." button
After step 1, a new window will appear. From here choose, the "Advanced" tab and then click on the "Maintenance..." button
3. Ensure settings are correct
Here we need to ensure that "Purge deleted messages when leaving IMAP folders" is checked before clicking on the "Close" button
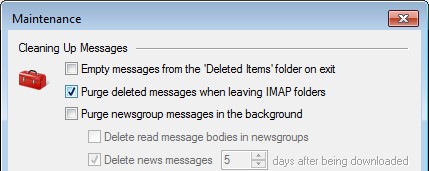
"Apply" the settings in the "Options" window and you're done!
