
Photos taken with your camera or even your phone can be quite large these days, typically around 5mb.
And you really don’t want your website visitors waiting whilst your web page loads one or more pictures of that size, because it will take ages.
Typically the best file size for images for a web page will be in the range of 10k – 250k
(that’s a reduction of 90% from the original file size).
So how do you achieve that?
3 Ways to resize your images Free!
1 – Image Resizer is a free application you can download
https://imageresizer.codeplex.com
2 – If you are still using Windows XP the facility is built into the system. Here’s how to use it…
http://windows.microsoft.com/en-us/windows-xp/help/digitalphotography/resize-digital-pictures
3 – Another way on Windows is with the “Windows Live Photo Gallery” application.
To see if you have this free Microsoft software, click the Start button and type “photo”. If you see Windows Live Photo Gallery (also called Windows Photo Gallery), click it to launch the program.
If you do not see it, head on over to the following site and download the installer. You can also install other parts of Windows Essentials 2012 if you’d like. Here’s the link:
http://windows.microsoft.com/en-us/windows-live/photo-gallery
Now that it’s installed, you have a fabulous little piece of software to organize, view, and even touch up your collection of photos and other images. Launch the program as described above.
The first step is to find your images in the left pane of Photo Gallery:
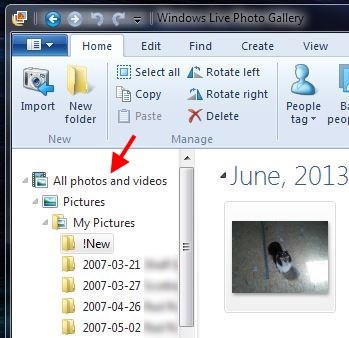
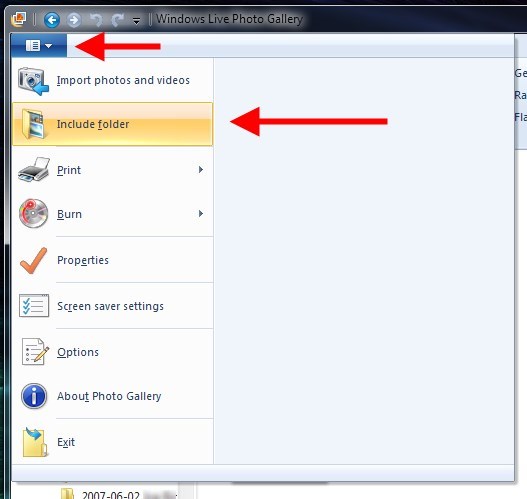
If they’re not listed, you can add the folder where they are located to your Pictures Library. For example, I often have some pics on my Desktop, and I’d like to add my Desktop so that any images there will appear in Photo Gallery. Just click the blue button in the top left corner of Photo Gallery, and then select “Include folder”, like so:
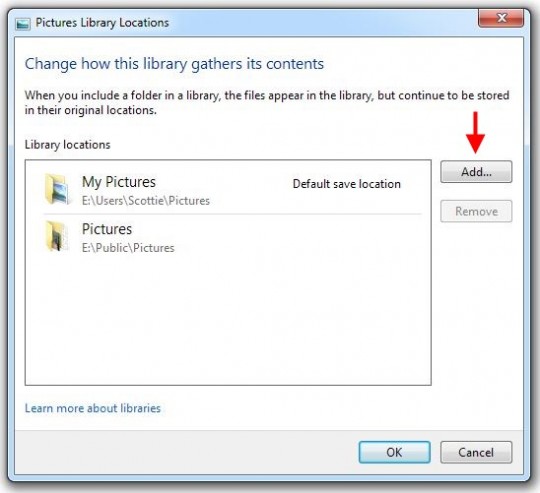
This will bring up the Pictures Library Locations window. You can click the Add button, choose the Desktop folder/icon, and then click the “Include Folder” button, like so:
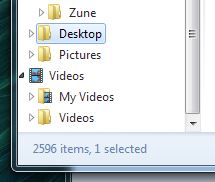
Now look in the left pane of Photo Gallery again, and you should see Desktop listed. Click the Desktop folder to see all the images:
In the main pane, select each image you’d like to resize by hovering over it and clicking the checkbox. This allows you to select multiple images.

Right-click anywhere on one of the selected images, and choose “Resize…”. This will bring up the Resize window. Here you can select a size (measured by the resized image width in pixels), then click the “Browser…” button to choose where you want to save the resized images, and then just click the “Resize and Save” button.

Photo Gallery will then take each image you selected, resize it to the specified size, and save it to your “Save to:” folder. In my case, I saved the resized images to the Desktop.
That’s it! Now you have resized pics that you can upload, share, or whatever. Note that the original images are preserved, so when you’re done, you can safely delete the resized pics.
Hopefully this will make your life a bit easier, and it’s completely free!